What Is Contour Makeup? In the world of glamour and beauty, contour makeup has become a dazzling game-changer, helping us flaunt our best features while cleverly disguising any perceived flaws. It’s like having a magic wand but, you know, way cooler! With the right techniques and products, contouring can transform a simple look into a captivating masterpiece. So, let’s dive into the fabulous realm of contour makeup and discover what it really is, how to use it, and everything in between!
The Basics of Contour Makeup
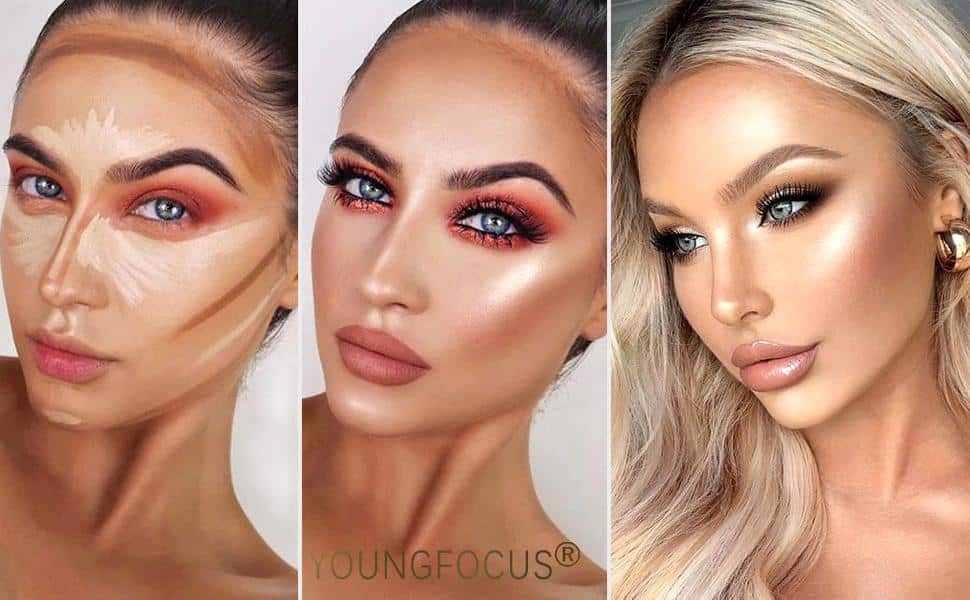
To break it down simply, contour makeup is all about playing with light and shadow on your gorgeous face. The purpose is to enhance your bone structure and create dimensions. By applying darker shades in certain areas and lighter shades in others, you can sculpt your features like a true art aficionado. Imagine a classic sculpture—now, think of your face as a blank canvas ready for some fabulous artistry!
There are various products available for contouring, ranging from cream sticks and powders to liquids. The texture and finish you choose can drastically change the vibe of your finished look, so it’s essential to pick what works best for you. Cream contours are perfect for a dewy finish, while powder contours lend to a more matte finish. Let’s keep it simple: go with what feels right and suits the occasion!
The Essential Tools for Contour Makeup
Before diving into the fun part of applying contour makeup, it’s crucial to gather your tools! Here’s a little checklist of essentials:
- Contour Products: Choose between cream, powder, or liquid products based on your skin type.
- Highlighting Products: A light highlighter (liquid, cream, or powder) to give your skin that gorgeous glow.
- Brushes: A tapered blending brush for contour and a fan brush for highlighting. Don’t underestimate the power of a good brush!
- Beauty Blender: Perfect for seamless blending, especially with cream products.
- Setting Powder: To lock in your look and keep that beautiful face fresh and fabulous all day.
An important aspect of contouring is selecting the right shades. Generally, the rule of thumb is to choose a contour shade that is one to three shades darker than your natural skin tone and a highlight that is one to three shades lighter. A touch of harmony is key here, so don’t go crazy with stark contrasts!
You can also opt for cool-toned shades for a more sculpted look or warm-toned shades for a glowy, sun-kissed vibe. Think of your favorite celebs—you’ll notice they often have makeup artists crafting a look that plays with these tones. The right hues can make a world of difference!
Step-by-Step Guide to Contour Makeup Application
Now, let’s get into the nitty-gritty of how to apply contour makeup. Follow this step-by-step guide, and you’ll be turning heads in no time!
1. Prep Your Skin
Before anything, make sure to start with a clean, moisturized canvas. Prep your skin with your favorite primer to ensure makeup glides on smoothly. After that, apply your foundation to even out your skin tone—a flawless base is a must for great contouring!
2. Map Out Your Contours
With your foundation in place, grab your contour product and apply it to the areas you want to define. The typical areas to focus on are the hollows of your cheeks, the sides of your nose, and along your jawline. You can also add contour to your forehead’s sides for a more elongated look. Drawing on your face? It’s like a Pinterest board come to life!
3. Blend, Blend, Blend
Grab that beauty blender or tapered brush and start blending! The key here is to ensure that there are no harsh lines—blending is everything! You should aim for a seamless gradient that looks beautiful and natural. And remember, less is often more, so start with a little product and build up the intensity if needed!
4. Highlight to Illuminate
Next, using your highlighting product, apply it to the areas you want to accentuate. Typically, this includes the tops of your cheekbones, the bridge of your nose, the center of your forehead, and your cupid’s bow. This step adds that ethereal glow and lifts your entire look.
5. Set Your Makeup
Finish off your masterpiece with a setting powder or spray. This step is critical, especially if you’re heading out for a fabulous event—you want your hard work to stay put!
Common Contour Makeup Mistakes to Avoid
Even the pros make mistakes sometimes! Here’s a quick list of common contour makeup blunders to be aware of so you can dodge those pitfalls:
- Wrong Shades: As tempting as it can be to go a few shades deeper for drama, it can often lead to overpowering looks. Stick to shades that complement your natural beauty.
- Harsh Lines: Blend, blend, blend! Those lines should be as soft as a cloud. No one likes a chiseled façade unless we’re talking about a Greek statue, and even then…
- Ignoring Skin Type: Consider your skin type when choosing products. If you have dry skin, go for cream or liquid formulas; if oily, powders might be your best bet.
Contouring for Different Face Shapes
Understanding face shapes is crucial for contouring! Here’s a quick breakdown of how to contour based on your face shape:
| Face Shape | Contouring Tips |
|---|---|
| Oval | Subtle shading on the sides and mentioning the forehead; keep it natural. |
| Round | Add more contour to the sides and under the chin to elongate the face. |
| Square | Focus on softening the jawline and applying highlighter on the center of the forehead. |
| Heart | Contour the forehead slightly and focus on defining the chin area. |
Final Touches with Contour Makeup
Once your contour and highlight are set, don’t forget to finish off your look with some lovely blush and a spritz of setting spray! This will tie everything together and ensure you radiate confidence.
Conclusion: Embrace Your Inner Artist with Contour Makeup
contour makeup is not just a trend but a fun way to embrace and enhance your natural beauty. With the right techniques and a sprinkle of creativity, anyone can master the art of contouring and sculpting. So go ahead and experiment with different shades and styles—because makeup is about expressing yourself and having a whimsical time along the way.
For more beauty inspiration, check out Beauty.com and Makeup Artist Magazine for tips and tricks!
Happy contouring, gorgeous!