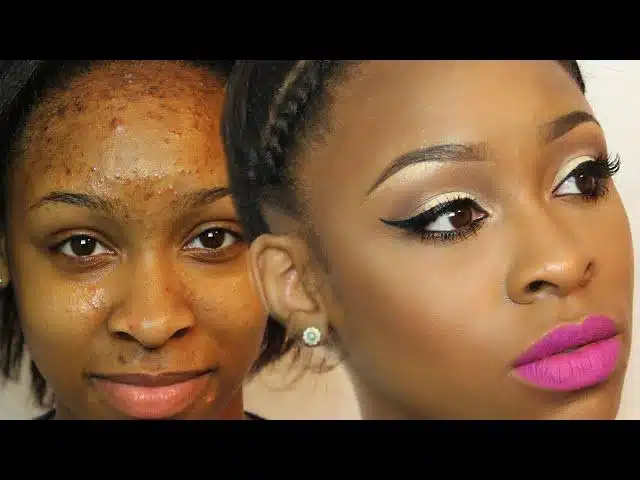

How To Cover Up Bumps With Makeup?
Oh darling, we all have those days when our skin decides to go on a funky adventure, doesn’t it? Whether it’s a pesky pimple, a random bump, or just some skin texture we could do without, mastering the art of covering up those little nuisances with makeup is a total game changer. You’re probably wondering, How To Cover Up Bumps With Makeup in a way that looks flawless and natural. Fear not, because I’ve got the ultimate guide packed with tips, tricks, and a sprinkle of fun!
Understanding Your Skin’s Canvas
Before diving into the magical world of makeup, it’s super important to understand the good old canvas you’re working with—your skin! Everyone’s skin is unique, and knowing your skin type can really help in choosing the right products.
Different Skin Types and Bumps
-
- Oily Skin: If you’re like me and you’re prone to shine, oily skin can sometimes mean frequent breakouts! The bumps may be more pronounced, but don’t you worry—there are fabulous products out there to help you matte things down!
-
- Dry Skin: Cracked, flaky skin can lead to uneven texture, making it hard for makeup to go on smoothly. Hydration is key here, and I’ll share some great tips on how to prep your skin properly.
-
- Combination Skin: Oh, the best of both worlds! You might find bumps showing up in your oily T-zone while your cheeks might be parched. A tailored routine is essential!
-
- Sensitive Skin: If your skin reacts to products faster than a gossip can spread at a brunch, you’ll need to tread carefully! Look for gentle formulas and be sure to patch test any new products.
Step-By-Step Guide on How To Cover Up Bumps With Makeup
Now that you’re familiar with your skin type, let’s get into the juicy bits! Here’s a simple yet effective routine that will guide you through the process, from prep to perfection.
Step 1: Skincare Prep
Cleanse and Exfoliate
The first step is always a clean slate! Use a gentle cleanser suited to your skin type. Don’t forget to exfoliate regularly to keep texture at bay—think of it like prepping your canvas with the best gesso!


Moisturize
After cleansing, apply a lightweight moisturizer to keep your skin hydrated. If you’re oily, look for oil-free options. For dry or sensitive skin, a richer formula will work wonders.


Prime It Up
Here’s where the magic starts! A good primer can smooth out surface imperfections, making it the perfect starting point for your makeup. Choose a mattifying primer for oily skin or a hydrating primer if you’re more on the dry side.


Step 2: Choosing the Right Foundation
Choosing the right foundation is like choosing your favorite pizza topping—everyone has a preference!
Foundation Types
-
- Liquid Foundations: These provide excellent coverage and can be built up for more trouble spots.


-
- Stick Foundations: They are perfect for targeted coverage and are incredibly convenient for on-the-go touch-ups.


-
- Powder Foundations: Great for oily skin types, they can give you that polished look without looking cakey—just be careful of the amount!


Application Techniques
-
- Beauty Blender: A moist beauty sponge helps to bounce the foundation onto the skin, giving it a flawless finish.


-
- Brushes: A flat foundation brush or a buffing brush can work wonders too! Just ensure that it’s clean to avoid adding more bumps!


Step 3: Targeting the Bumps
This is the moment you’ve been waiting for! Now let’s tackle those bumps with precision.
Concealers to the Rescue
The magic wand of makeup—concealer! They come in various formulas, from creamy to liquid. Choose a shade that matches your skin or is one shade lighter for the perfect brightening effect.
Application Tips
-
- Dab a bit of concealer directly onto the bump using your fingertip or a small brush.
-
- Blend with a tapping motion to avoid moving the foundation underneath.
-
- Ensure it’s set with a bit of translucent powder to avoid any creasing!
Step 4: Setting for Success
Ah, the keys to maintaining that flawless look! Setting your makeup not only prolongs its wear but also helps to prevent your makeup from settling into any bumps.
Powders vs. Sprays
-
- Setting Powder: Oily skin loves this! Use a lightweight, translucent powder and dust it gently over your face. This will set everything in place without adding extra heaviness.
-
- Setting Spray: For a dewy finish, a setting spray can lock everything in while giving you that refreshing glow.
Step 5: Finishing Touches
Lashes, brows, lip color—time to let your personality shine through! Don’t forget to add some bronzer or blush to bring color back to your face. Just keep in mind that heavy blush can accentuate bumps, so go easy!
Quick Tips on How To Cover Up Bumps With Makeup
-
- Hydrate: Drink plenty of water so your skin doesn’t look dehydrated under makeup.
-
- Avoid Too Much Product: Layers can make bumps more noticeable, so be strategic!
-
- Always Use Clean Tools: Bacteria from dirty brushes can lead to more bumps. Clean them regularly—your skin will thank you!
-
- Patch Test: If trying a new product, always patch-test to avoid unwanted surprises!
Makeup Products to Consider
Here’s a handy table showcasing some fabulous product recommendations for glam that won’t flake your day away:
| Product Type | Recommended Products |
|---|---|
| Primer | Smashbox Photo Finish; e.l.f. Hydrating Primer |
| Foundation | Fenty Beauty Pro Filt’r; L’Oréal Infallible |
| Concealer | Tarte Shape Tape; Maybelline Instant Age Rewind |
| Setting Powder | Laura Mercier Translucent Powder; NYX HD Finishing Powder |
| Setting Spray | Urban Decay All Nighter; Milani Make It Last |
For more insights on achieving flawless skin, check out this skin care guide and let your skin shine!
Conclusion on How To Cover Up Bumps With Makeup
With these tips in tow, you’re now ready to confidently face the day, bumps and all. Remember, practicing how to cover up bumps with makeup is an art that takes time—and just like any art, sometimes you need to step back, assess, and try again! Embrace your unique beauty, and let makeup be a fun extension of that. The next time those little bumps decide to crash the party, you’ll know exactly what to do to show them who’s boss!


